


There are two core menus in Therapy Site Builder. You will access the bulk of the functionality through these menus. Let's walk through these menus, so you're familiar with where they are at and what they do.
FIRST MENU

The first menu has 4 main tabs.
- Builder
- Store
- Contacts
- Booking
You will spend most of your time in the "builder" tab. This is where you can create new web pages, edit existing web pages, use widget functionality when editing/creating web pages, edit the styling of your web pages, edit your website settings, and preview changes you make to your website.
The store tab is where you will setup your products/services whether digital or more traditionally based. One of the options in the "store" will be "payment method" which you'll need to click and choose a payment gateway to associate with your products. Most entrepreneurs we are familiar with prefer Stripe, but you're welcome to use the ones that best meet your needs.
The contacts tab is a simple way to keep track of all your contacts, leads, etc that come in through your website. For example, if you create a page where you offer a guide for free in exchange for an email address, the contacts will all appear in the "contacts" tab after they submit information.
The "booking" tab is where you will go to create new calendar booking pages. If you want someone to schedule an appointment with you, this is where you'd need to go to set things up. Keep in mind, that creating a booking event will not automatically create a booking page for you. After you setup the booking event details, you'll need to go back to the "builder" tab, create a new page, and use the "booking widget" (drag and drop the booking widget onto a blank part of page) to actually have a booking page visible.
SECOND MENU
The other main menu you will see in Therapy Site Builder is within the "builder" tab. This menu appears on the left portion of the page. The first icon (three horizontal bars) is for creating new web pages, pop-ups, or page groups, and editing existing web pages.
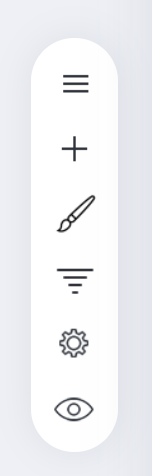 The second icon is where you go to utilize a variety of widgets. These widgets are very helpful in making creating new web pages or adding to existing web pages. Create a new page (blank) and just play around with all the wdigets till you get familiar with what they can all do.
The paintbrush type icon is for sytling changes you'd like to make to your website.
The next icon is for funnels. We will discuss funnels in depth in other articles. These are more for specific marketing objectives or campaigns you have which is useful for creating a more focused guided journey for your users rather than have them wandering around your website without knowing what to do next with lots of information to distract them.
The gear icon is for your website settings. You'll find most settings related information for your website here.
The eye icon is for previewing your website. This is helpful for when you create something and want to get an idea of what it looks like on desktop/mobile.
We will cover each menu item in more detail in other knowledgebase articles and future updates.